This put up was first printed on Medium.
We’re proud to announce that Bitcoin now helps PLONK. For an in depth description of how PLONK works, you’ll be able to seek advice from our earlier explanations, Part 1 and Part 2.
We now have beforehand applied Groth16, the smallest and most effective SNARK building. Nevertheless, it requires a trusted setup for every circuit. By eliminating the necessity for a per-circuit trusted setup, PLONK each mitigates considerations concerning the safety of that course of and ensures that no safe multi-party computation (MPC) setup ceremonies will likely be required once more if circuit adjustments sooner or later as a consequence of, e.g., essential bug fixes. Common and updatable setup ceremonies, corresponding to Perpetual Powers of Tau, will be reused for any circuit in PLONK. It makes deploying new circuit and upgrading present circuits a lot simpler and safer.
Run your first PLONK on Bitcoin
We now have added PLONK assist in our present snarkJS library, which is absolutely appropriate with Circom. All Circom circuits developed for Groth16 will be straight reused in PLONK with none change in any respect. The complete PLONK verifier code will be discovered here, together with a test in Javascript. Producing a PLONK verifier is much like developing a Groth16 verifier in snarkJS.
You should set up Circom compiler and our snarkJS first.

1. Design a circuit
Implement circuits in Circom language. For instance, this easy circuit/program known as ‘issue.circom’ proves that folks know to issue the integer ‘n’ into two integers with out revealing the integers. The circuit has two non-public inputs named ‘p’ and ‘q’ and one public enter named ‘n.’ For extra info on easy methods to use Circom, you’ll be able to seek advice from https://docs.circom.io.
2. Compile the circuit
Compile the circuit with the next command:
![]()
3. Begin a brand new **powers of tau** ceremony
The ‘new’ command is used to provoke the ceremony of **powers of tau**.

Lastly we confirm the protocol to date:
![]()
4. Setup
This may generate a proving key for the circuit and confirm that key, utilizing PLONK.

5. Export verification key
We export the verification key from ‘circuit_final.zkey’ into ‘verification_key.json.’

6. Calculating a witness
First, we create a file ‘enter.json’ containing the circuit inputs with the next contents:

Subsequent, we use the ‘issue.wasm’ obtained from compiling the circuit to calculate the witnesses:
![]()
7. Create a proof
It makes use of the proving key and witnesses to generate a proof, utilizing PLONK.

8. Export an sCrypt verifier
This outputs a smart contract file “verifier.scrypt” that comprises all of the code wanted to confirm the proof on-chain.
![]()
You may confirm it regionally:
![]()
9. Deploy the verifier
Now you can deploy the verifier to Bitcoin. Wrap verifier.scrypt in a check contract PlonkVerifier as under.
Now you should utilize sCrypt IDE to deploy it.
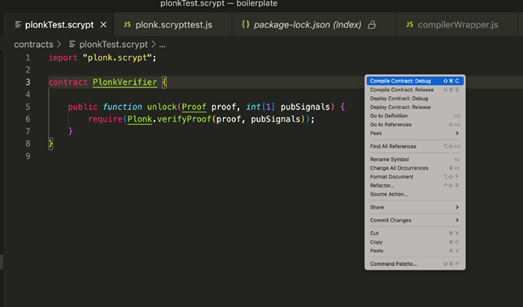
Proper click on and choose Deploy Contract: Debug.
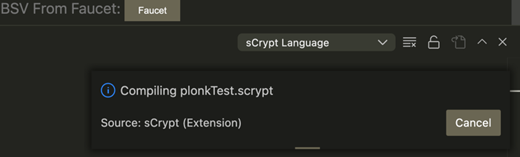
After the contract is compiled, which shall end inside a couple of minutes, the next panel ought to pop up. Click on Deploy.
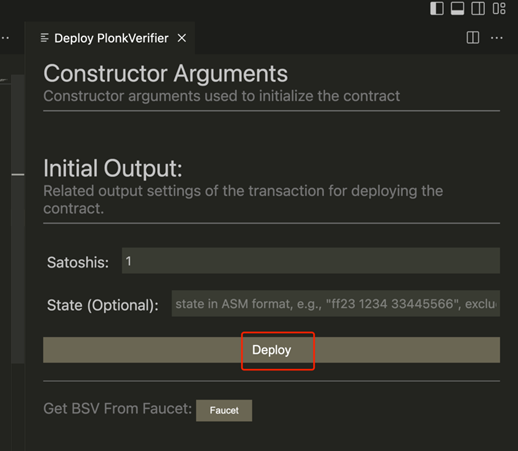
If every thing goes proper, the verifier contract ought to have been deployed.

10. Confirm the proof
Subsequent, you’ll want to repeat and paste from proof.json into Name panel and click on on Call unlock().
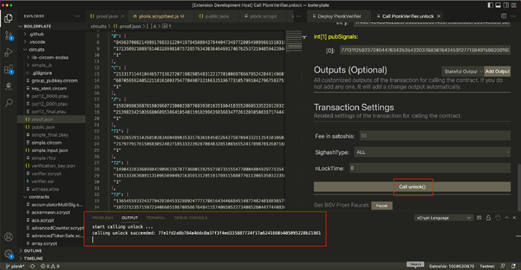
If every thing works okay, you must see the proof validated in a spending transaction.
What’s subsequent?
Congratulations! You could have simply created your first PLONK proof on Bitcoin. Up to now, we have now applied each Groth16 and PLONK. Any proof system will be applied the identical manner as a wise contract, due to Bitcoin’s programmability and scalability. Now it’s time to implement your favourite proof techniques, together with Marlin, Sonic, Halo, Bulletproof, and STARK.
Watch: The BSV World Blockchain Conference presentation, Sensible Contracts and Computation on BSV
width=”560″ top=”315″ frameborder=”0″ allowfullscreen=”allowfullscreen”>
New to Bitcoin? Take a look at CoinGeek’s Bitcoin for Beginners part, the final word useful resource information to be taught extra about Bitcoin—as initially envisioned by Satoshi Nakamoto—and blockchain.